How to Enable/Disable the In-Place Archive Mailbox in Office 365
Primary mailbox is the default Mailbox of o365 which has both read and write access and perform the send and receiving process. All the data related to contacts, calendar, notes, tasks, etc. are saved here. Once the Primary mailbox full then we need more space then you need to enable the Archive Mailbox. Here I am going to discuss how to enable/disable the In-Place Archive mailbox in Office 365 and also explain about the Online Archive mailbox.
In –Place Archive mailbox are the secondary folder in Office 365 provided by the Microsoft up to 100 GB for free which is used to store the data. You can also say that it is the storage folder which allows you to only read the data but cannot perform any task.
Method 1: Enable or disable Online Archive mailbox in o365 using Admin account.
Here I am going to tell the process to turn-on or turn-off the In-Place archive mailbox in Exchange Online Cloud Platform.
How to enable archive mailbox in Office 365?
Log in to Admin account. Go to Admin centers icon, click on Exchange.
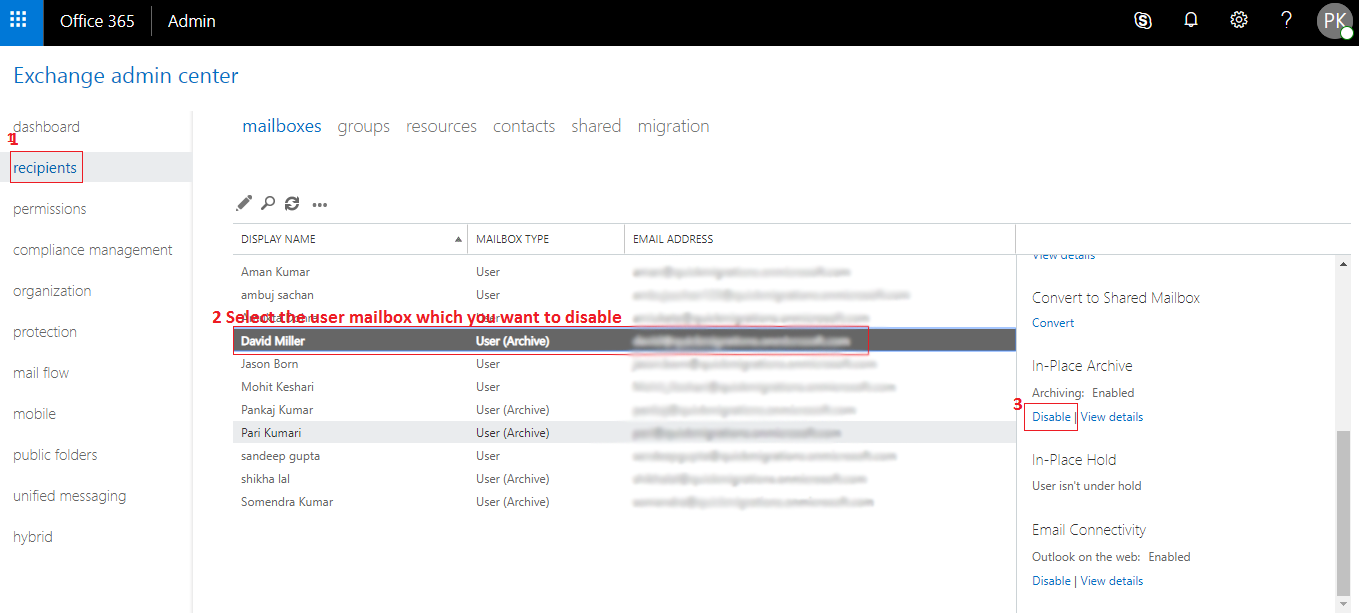
Under the recipient section, select the user for whom you want to create the archive folder in the Mailbox. As you select the user, a screen will appear on the right side. There you find the In-Place Archive option, you need to click on Enable to turn-on the archive mailbox for that particular user.

Once you click on the Enable option a warning message will be displayed on the screen. Click Ok. It takes some time to create and make it visible to the user account. Once it is noticeable, the user will be able to see the archive mailbox to his account.
How to disable archive mailbox in Office 365?
In the same way, you can disable the archive folder if it is already enabled. You need to click on Disable option which allows to turn off the user’s archive mailbox in Exchange Online.
Method 2: Enable or disable In-Place Archive mailbox in Exchange Online using PowerShell?
To enable the Archive mailbox you need to run the given step by step commands.
1) First, you need to get the credentials to connect PowerShell to o365. For this type the following command.
$UserCredential = Get-Credential
$Session = New-PSSession –ConfigurationNameMicrosoft.Exchange –ConnectionUri https://outlook.office365.com/powershell-liveid/ -Credential $UserCredential –Authentication Basic -AllowRedirection
As you press Enter after writing the command it will ask you to type the Admin ID and Password.
2) Assign all the policies which connect PowerShell to the Exchange Online server and create the remote session.
Set-executionpolicy remotesigned
3) Import the created PS session to Office 365.
Import-PSSession $Session
4) Use the given command to get all users’ mailbox of Office 365.
Get-Mailbox
5) To enable the user mailbox to type the given command:
Enable-Mailbox "ankit" -Archive
Note: To disable the user mailbox, you can type:
Disable-Mailbox "ankit" -Archive
Conclusion: In this blog, I tried to explain the step by step process to enable or disable the Office 365 In-Place or Online Archive mailbox using o365 Admin portal and the Windows PowerShell commands. If you still have any query then leave a message on the comment section.